

All personnel must read the following operating instructions.
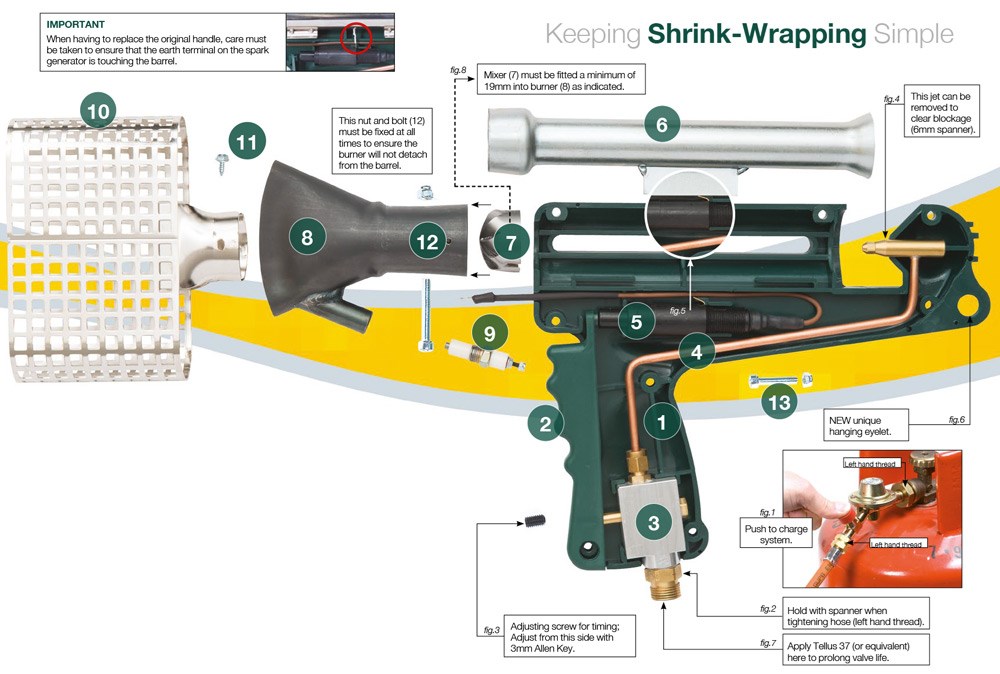
Before proceeding please check gas bottle outlet is clean as this is the most common cause of failure. Connect regulator into gas outlet and hose to regulator (left hand threads) – see fig.1. Connect shrink gun to other end of hose (left hand thread) see fig.2.
Turn on gas and slowly press the excess flow check valve to charge the system with gas (see fig.1).
Inspect connections for leaks (see Safety Instructions point 4 below). Point the gun towards a clear area of the floor and squeeze the trigger slowly. It is possible that the gun will ignite with only one small squeeze of the trigger, especially if it is warm and the operator has had a small amount of practice. The trigger must be depressed to maintain the flame.

Shrink-wrap Unit in Operation Hazards and Safety Instructions
- Instruction in the safe operation of system must be given before any person is permitted to use the equipment.
- Only trained personnel should operate the system.
- Be sure to use a gas bottle with vapour only withdrawal.
- Gas tight joints must be maintained. Always check the hose and connections for leaks before use, there is an aerosol spray ‘leak detection’ available or (a soapy liquid brushed on joints will quickly detect leaks).
- NEVER use the system with a damaged hose, regulator etc.
- Suitable gloves must be worn.
- The gun should not be used in hazardous situations, i.e. inflammable or dust-laden areas.
- Care should be taken to ensure the gas bottle is not pulled along by the hose.
- NEVER DIRECT GUN TOWARDS ANY OTHER PERSONNEL.
- NEVER LOOK IN BURNER OPENING WHEN GUN IS CONNECTED.
- MAKE sure gas supply has been turned off correctly and any excess gas has been burned off before leaving gun unattended.
- NEVER lay the gun on the floor. Always hang the gun up using the eyelet provided (see fig.6).
- NEVER hold gun in the vertical position when shrinking top surfaces as rising heat can cause an unstable flame (*see illustration below)
- The mixer MUST be fitted a minimum of 19mm into the burner (see fig.8).
|
DO NOT hold the gun in a vertical position when shrinking the top surface of an object as rising heat can cause an unstable flame |
|
Location and Ventilation for Shrink-wrapping
- Area for shrink-wrapping must be oil, grease and dust free and clear of all combustible material. The operator must ensure no objects will interfere with the operation of the shrink gun.
- Some consideration should be given to the erection of non-combustible screens around the area of operation.
- The shrink gun should be operated in a well-ventilated area, to ensure good all-round airflow when shrink-wrapping.
Fire Extinguishers
- Suitable extinguishers should be available for immediate use at site of operation.
PLEASE NOTE:
Failure to comply to any of the above instructions, including tampering with or dismantling of the gun, will invalidate your warranty. If you have any problems or queries regarding your shrink system, please contact your supplier.
Maintenance – Must only be carried out by an experienced gas fitter.
A regular drop of oil (as supplied) into the valve at the hose connection (see fig.7) will prolong valve life. Blow dirt from inside the barrel at regular intervals as reduced air flow will cause overheating and an irregular flame. Gas tight joints must be maintained always check the hose and connections for leaks before use.
Fault Finding Chart
| Problem | Problem Cause | |
| Gun not firing | Gas supply not on. Excess flow check valve not primed (see fig.1). Damaged electrode. Gas valve adjustment screw not operating plunger (see fig.3). Defective spark generator. Earth strip on spark generator not touching barrel stabilizer (see fig.5). |
|
| Gas has yellow flame | Gas pressure too low. Dirt in barrel. Blocked jet (see fig.4). Gas leak in body. Blocked valve. Iced supply. |
|
| Large flame | Pressure too high. Jet too large (see fig.4). Blocked or damaged mixer. |
|
| Constant gas | Gas valve adjusting screw tight against plunger (see fig.3) or valve sticking. |
